


 First Guide to SQL Anywhere Studio
PART 2. Getting Results with SQL Anywhere Studio
CHAPTER 4. Managing Databases with Sybase Central
This tutorial takes you through the steps adding a table to the sample database. This task includes adding columns to an existing table. The tutorial covers the following interface skills:
Using the table editor to add tables and columns
Using property sheets to add new object properties
Using drag-and-drop techniques to add new objects
To add a table to your database you define the name and properties of your table its columns using a tool called the table editor. The table editor displays the table columns and their properties in a spreadsheet-like grid. When these definitions are saved, the table is created.
 Creating tables and adding columns in Sybase Central
Tables are added or edited using the table editor, which displays column properties in a grid: column properties are displayed along the top of the grid while the columns are identified by rows, one for every column in the table.
In this tutorial we create a table in the sample database. The new table will describe different offices for the sample database.
 To create a table and columns:
Select the Tables folder in the left panel. This can be done by first expanding the server and database containers, then clicking on the Tables folder.
Double-click the Add Table object in the right panel, causing the Table Editor to appear.
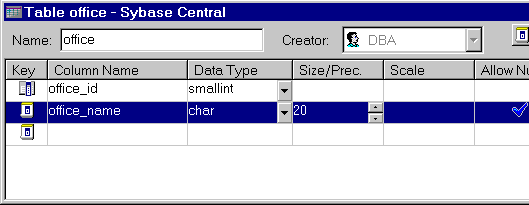
Type the name for the table in the Name text box in the upper left corner of the table editor. In this case, use the name office.
Click in the Column Name column of the first row to enter the name of the first column in the table. Use the name office_id.
Under the Data Type column choose smallint from the drop down list of standard data types.
Do not make any entries under the Size/Precision, Scale and Comments columns. Ensure the entry under the Allow Nulls column is left unchecked so this column can later be used as a primary key.

Click the Advanced Table Properties button on the toolbar and enter the comment Company offices in the Comment text box. Comments are an optional property.
Finish creating the table by clicking the Save and Close toolbar button. The table editor disappears and the office table is added as another table in the Tables folder. It can be viewed in the right panel by selecting the Tables folder in the left panel.
The following section describes how to edit an existing column and add a primary key to the table using the table editor.
Editing existing tables using the table editorThis section describes how to edit an existing table. The following steps will add a primary key to a table created in the previous section named office. This will be accomplished by turning a column named office_id into a primary key. This column holds a numerical ID for each office.
To edit an existing table using the table editor:In the left panel, select the office table. You may have to expand the server, database and the Tables containers to view the office table.

Using the right mouse button, click on the selected office table to display the pop-up menu for the table object and select the Edit Columns menu item (the same menu item is also available under File menu on the menu bar). This causes the table editor to appear, displaying one row for every column in the table.
Click once on the office_id row, under the Key column. The icon changes to show the column named office_id is now also the primary key for the table named office.
Primary key conditions |
Click the Save toolbar button to commit the changes to the office table.
Click the Add Column toolbar button to create another row in the table editor grid. This adds another column in the office table.
Edit the properties of the new column so that it's name is office_name, its type is char, its size is 20 and its value can be equal to null.
Click the Save and Close toolbar button to commit the changes and close the table editor.
The column is now present in the database, although it has no data. Sybase Central does not include facilities for data entry.
Dragging a column to a new table using Sybase CentralThis section describes how to add a column to the office table created in a previous section to hold the address of each office. The customer table in the same sample database already has an address column, which can be copied and added to the office table. These steps will copy the attributes, including the name, of a column in one table to another table, but will not copy data from one table to another.
To drag a column to a table:In the left panel, click and expand the customer table to expose the Columns folder. You may have to expand the database container and the Tables folder to do this.
Select the Columns folder. The right panel will adjust to display the columns in the customer table.
Click the address column in the right panel, and drag it to the office table in the left panel. The Copy Column Definition window is displayed.
Click OK to add the column to the office table. It will have the same attributes as the address column of the customer table but will contain no data.
To see the new column, select and expand the office table in the left panel, then select the Columns folder. The right panel will display the columns of the office table. The newly-added address column should be visible in the right panel.
To see the attributes of the address column, double-click the address column in the right panel. The address properties sheet appears.

Change the name of the column to office_address by typing this in the Name text box and click on apply to accept the change. This modification applies to the address column of the office table only. Once a column has been copied there is no longer any connection between the original column and the new column.
Drag and drop is available for several kinds of database management tasks. For example, you can add users to user groups by dragging, or drag a table to another table to create a foreign key relationship.
Property sheets are used extensively in Sybase Central. For example, property sheets are used for users, stored procedures and individual columns.
Add Object icons are used to add other objects besides tables to a database. Stored procedures, triggers, indexes, users, user groups, and columns are among the database objects that you can add with an Add Object icon.
Pop-up menus are available throughout the Sybase Central interface by clicking on objects or in windows using the right mouse button. Showing an object's pop-up menu is a convenient way of finding out what actions can be carried out on an object.
Deleting tables using Sybase CentralTables can be deleted, or dropped, from a database. The office table created in a previous section can be dropped from the sample database, restoring the database to its original state.
To delete the office table from the sample database:Using the right mouse button, click the office table.
Select Delete from the pop-up menu. A Popup appears allowing you to accept the deletion.