


 First Guide to SQL Anywhere Studio
PART 2. Getting Results with SQL Anywhere Studio
CHAPTER 4. Managing Databases with Sybase Central
In Adaptive Server Anywhere, both users and groups are objects within the database. However, groups are also containers, capable of containing users (making users a member of that group) and other groups.
In this structure, permissions granted to a group are inherited by those users and groups which have membership in the group. Adaptive Server Anywhere allows you to create users and groups permitted to use a database and grant membership to groups. Also, users and groups can be members of multiple groups.
This tutorial demonstrates how to create a group for the database, create an individual user, and make the user a member of the group.
 Adding a group to the database
In this section we add a sales group to the sample database.
 To add a group to a database:
Select the Users & Groups folder in the left panel. You may need to expand the sample database container in the left panel to do this.
Double-click Add Group in the right panel. The Create a New Group wizard appears.
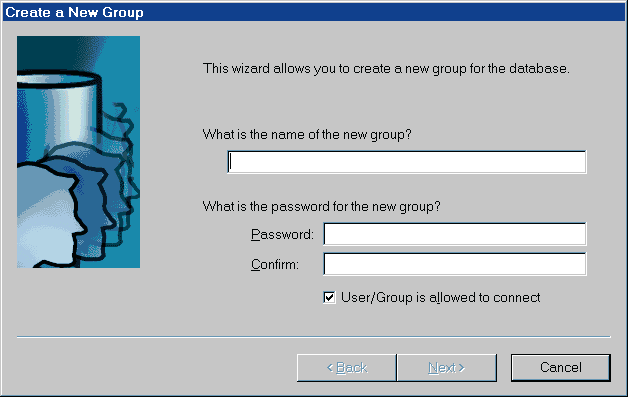
Type the name Sales in the top text box. This is the name of the user group.
Enter a password (for example, Sales), confirm it by entering it again, and click Next to show the following page of the wizard.
Check the Resource authorities option, and uncheck the DBA and Remote DBA option, for this group. Then click Next to show the following page of the wizard.
Click Finish to create the new group.
The sales group appears in both panels. Groups are container objects, and so appear in the left panel.
Adding a user to the databaseThis section describes how to add a user to a database.
To add a new user to the sample database:Select the Users & Groups folder in the left panel. You may need to expand the sample database container in the left panel to do this.
Double-click Add User in the right panel. The new user wizard appears.
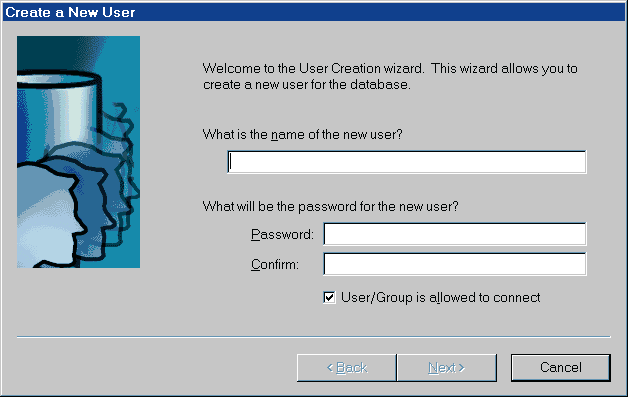
Type the name Sandy in the top text box. This is the user ID for the new user.
Type a password, and confirm it by retyping it. For example, you could use the password Sandy. Then click Next to show the following page of the wizard.
Follow the instructions to complete the wizard choosing the default options.
An icon appears in the right panel, showing the new user. There is no icon in the left panel, as individual user ID's are not containers.
Adding a user to a groupSybase Central provides two ways to add a user to a group. You can use the individual user's Properties sheet, which has a Membership tab. Or you can use a drag and drop method.
In this section we add two users to a group using drag and drop.
To add users to a group:Ensure that the Sales group is shown in the left panel and that the users DBA and Sandy are shown in the right panel. You may need to select the Users & Groups folder to do this.
Click Sandy to select this user.
While holding down the Ctrl key, click DBA to select this user as well.
Click and drag the users to the Sales group in the left or right panel.
Select the Sales group in the left panel to show its members.
To restore the database to its original state, you can delete the Sales group and the user Sandy. For each of the two icons:
Using the right mouse button, click the icon.
Select Delete from the pop-up menu and acknowledge the deletion.