 First Guide to SQL Anywhere Studio
 PART 2. Getting Results with SQL Anywhere Studio
 CHAPTER 10. Building a Dynamic Web Site with PowerDynamo
Before you start working with PowerDynamo, you need to prepare an ODBC data source and a connection profile, which you will do in this project. Each database-hosted Web site requires a data source and a connection profile. Once this has been accomplished you are able to connect to a database and generate a Web site.
 For information on creating file-hosted Web sites, see the PowerDynamo User's guide.
Connection profile and Data Source |
This project involves the following tasks:
Configure an ODBC Data Source for the Web Site
Create a Connection Profile
Connect to asademo
Create a URL mapping
 Create an ODBC data source for the Web site
Creating an ODBC System DSN is the same as creating an ODBC Data Source except that the System DSN is available to all users on a machine, including services.
 To create an ODBC System Data Source Name:
Start the ODBC Administrator. You may do this from the Utilities folder in Sybase Central.
Select the System DSN tab. The System Data Source window will open. Click the Add button.
The Create New Data Source window will open. Select the appropriate ODBC driver (for example, Adaptive Server Anywhere 6.0) and click Finish.
Enter the appropriate information in the ODBC, Database, and Login tabs.
Data source name: Anywhere
User Id: dba
Database name: asademo
Password: sql
Database file: path to asademo.db
The other tabs are not used in this tutorial. Click OK.
Click OK until all the dialog boxes have been closed.
 Create a connection profile
To create a Web site, you need to define a PowerDynamo connection profile for the specific database you want to connect to. A connection profile is associated with an ODBC data source. You create connection profiles and do most Web site generation and administration in Sybase Central.
Start Sybase Central.
Select Tools->Connection Profiles.
The Connection Profiles dialog box is displayed.
Click New.
The Create New Profile window appears.
Type ASASite as the profile name, and select PowerDynamo from the list of available types. Click OK.
The connection window appears.
Ensure that the Connection type is set to ODBC.
Select the Anywhere ODBC data source from the list of available sources.
Enter a user ID of dba and a password of sql. Click OK.
 Connect to asademo.db
Select Tools->Connection Profiles.
The Connection Profiles dialog box is displayed.
Select the ASASite profile in the Connection Profiles box.
Click Connect.
If you have not already connected to this database with PowerDynamo, Sybase Central will ask if you want to create a Web site on this connection
Click Yes.
After you click Yes, PowerDynamo asks you for the name of the main folder for the Web site.
Enter ASASite as the Web site name.
PowerDynamo asks if you would like to install the PowerDynamo documentation and sample application. Both will come in handy if you wish to do any work with PowerDynamo beyond this tutorial. Select the options you would like and click OK.
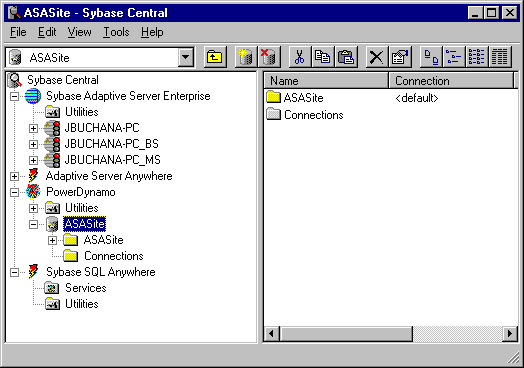
After site generation, two folders appear in the workspace, Connections and ASASite. You may need to scroll down in the Sybase Central window and double-click PowerDynamo to display the folders.

 Create a PowerDynamo Personal Web Server mapping
To connect to your new Web site from a local Web browser such as the Personal Web Server, you must create a mapping. This mapping associates a URL prefix with the Dynamo connection profile. To use the Personal Web Server, you must have TCP/IP installed.
From Sybase Central select PowerDynamo->Utilities->Configuration->Mappings.
Click Add Mapping.
Enter /ASASite as the URL prefix that the Web browsers will reference. Don't forget the slash character.
Select Database site as the access method.
Click Browse and select ASASite as the connection profile to which this mapping will refer.
Click OK.
The new mapping will be displayed in the right pane of Sybase Central.
You have now completed all of the administration details that enable you to create and work with a PowerDynamo Web site. The above steps need to be taken each time you create a new Web site.
In the next project you learn how to use PowerDynamo to create PowerDynamo Web pages in the form of scripts and templates.
