User's Guide
PART 2. Relational Database Concepts
CHAPTER 13. Designing Your Database
There are five major steps in the design process.
 For information about implementing the database design, see Working with Database Objects.
 Step 1: Identify entities and relationships
 To identify the entities in your design and their relationship to each other:
Define high-level activities Identify the general activities for which you will use this database. For example, you may want to keep track of information about employees.
Identify entities For the list of activities, identify the subject areas you need to maintain information about. These subjects will become entities. For example, hire employees, assign to a department, and determine a skill level.
Identify relationships Look at the activities and determine what the relationships will be between the entities. For example, there is a relationship between parts and warehouses. Define two roles to describe each relationship.
Break down the activities You started out with high-level activities. Now, examine these activities more carefully to see if some of them can be broken down into lower-level activities. For example, a high-level activity such as maintain employee information can be broken down into:
Add new employees.
Change existing employee information.
Delete terminated employees.
Identify business rules Look at your business description and see what rules you follow. For example, one business rule might be that a department has one and only one department head. These rules will be built into the structure of the database.
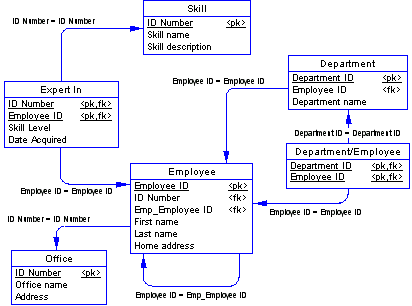
Entity and relationship exampleACME Corporation is a small company with offices in five locations. Currently, 75 employees work for ACME. The company is preparing for rapid growth and has identified nine departments, each with its own department head.
To help in its search for new employees, the personnel department has identified 68 skills that it believes the company will need in its future employee base. When an employee is hired, the employee's level of expertise for each skill is identified.
Some of the high-level activities for ACME Corporation are:
Hire employees.
Terminate employees.
Maintain personal employee information.
Maintain information on skills required for the company.
Maintain information on which employees have which skills.
Maintain information on departments.
Maintain information on offices.
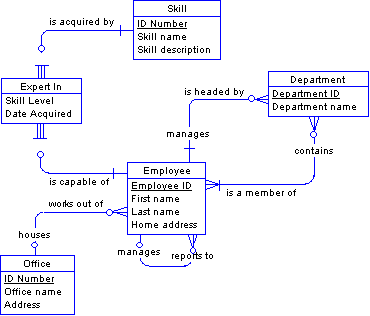
Identify the entities (subjects) and the relationships (roles) that connect them. Create a diagram based on the description and high-level activities.
Use boxes to show entities and lines to show relationships. Use the two roles to label each relationship. You should also identify those relationships that are one-to-many, one-to-one, and many-to-many using the appropriate annotation.
Below, is a rough entity-relationship diagram. It will be refined throughout the chapter.

The following lower-level activities below are based on the high-level activities listed above:
Add or delete an employee.
Add or delete an office.
List employees for a department.
Add a skill to the skill list.
Identify the skills of an employee.
Identify an employee's skill level for each skill.
Identify all employees that have the same skill level for a particular skill.
Change an employee's skill level.
These lower-level activities can be used to identify if any new tables or relationships are needed.
Business rules often identify one-to-many, one-to-one, and many-to-many relationships.
The kind of business rules that may be relevant include the following:
There are now five offices; expansion plans allow for a maximum of ten.
Employees can change department or office.
Each department has one department head.
Each office has a maximum of three telephone numbers.
Each telephone number has one or more extensions.
When an employee is hired, the level of expertise in each of several skills is identified.
Each employee can have from three to twenty skills.
An employee may or may not be assigned to an office.
Step 2: Identify the required data To identify the required data:Identify supporting data.
List all the data you need to track.
Set up data for each entity.
List the available data for each entity. The data that describes an entity (subject) answers the questions who, what, where, when, and why.
List any data required for each relationship (verb).
List the data, if any, that applies to each relationship.
The supporting data you identify will become the names of the attributes of the entity. For example, the data below might apply to the Employee entity, the Skill entity, and the Expert In relationship.
Employee |
Skill |
Expert In |
|---|---|---|
Employee ID |
Skill ID |
Skill level |
Employee first name |
Skill name |
Date skill was acquired |
Employee last name |
Description of skill |
|
Employee department |
||
Employee office |
||
Employee address |
If you make a diagram of this data, it will look something like this picture:
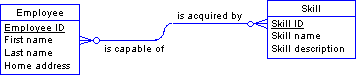
Observe that not all of the attributes you listed appear in this diagram. The missing items fall into two categories:
Some are contained implicitly in other relationships; for example, Employee department and Employee office are denoted by the relations to the Department and Office entities, respectively.
Others are not present because they are associated not with either of these entities, but rather the relationship between them. The above diagram is inadequate.
The first category of items will fall naturally into place when you draw the entire entity-relationship diagram.
You can add the second category by converting this many-to-many relationship into an entity.

The new entity depends on both the Employee and the Skill entities. It borrows its identifiers from these entities because it depends on both of them.
When you are identifying the supporting data, be sure to refer to the activities you identified earlier to see how you will access the data.
For example, you may need to list employees by first name in some situations and by last name in others. To accommodate this requirement, create a First Name attribute and a Last Name attribute, rather than a single attribute that contains both names. With the names separate, you can later create two indexes, one suited to each task.
Choose consistent names. Consistency makes it easier to maintain your database and easier to read reports and output windows.
For example, if you choose to use an abbreviated name such as Emp_status for one attribute, you should not use a full name, such as Employee_ID, for another attribute. Instead, the names should be Emp_status and Emp_ID.
At this stage, it is not crucial that the data be associated with the correct entity. You can use your intuition. In the next section, you'll apply tests to check your judgment.
Step 3: Normalize the dataNormalization is a series of tests that eliminate redundancy in the data and make sure the data is associated with the correct entity or relationship. There are five tests. This section presents the first three of them. These three tests are the most important and so the most frequently used.
Why normalize? |
For more information about the normalization tests, see a book on database design.
There are several tests for data normalization. When your data passes the first test, it is considered to be in first normal form. When it passes the second test, it is in second normal form, and when it passes the third test, it is in third normal form.
To normalize data in a database:List the data.
Identify at least one key for each entity. Each entity must have an identifier.
Identify keys for relationships. The keys for a relationship are the keys from the two entities that it joins.
Check for calculated data in your supporting data list. Calculated data is not normally stored in a relational database.
Put data in first normal form.
If an attribute can have several different values for the same entry, remove these repeated values.
Create one or more entities or relationships with the data that you remove.
Put data in second normal form.
Identify entities and relationships with more than one key.
Remove data that depends on only one part of the key.
Create one or more entities and relationships with the data that you remove.
Put data in third normal form.
Remove data that depends on other data in the entity or relationship, not on the key.
Create one or more entities and relationships with the data that you remove.
Before you begin to normalize (test your design), simply list the data and identify a unique identifier each table. The identifier can be made up of one piece of data (attribute) or several (a compound identifier).
The identifier is the set of attributes that uniquely identifies each row in an entity. The identifier for the Employee entity is the Employee ID attribute. The identifier for the Works In relationship consists of the Office Code and Employee ID attributes. You can make an identifier for each relationship in your database by taking the identifiers from each of the entities that it connects. In the following table, the attributes identified with an asterisk are the identifiers for the entity or relationship.
Entity or Relationship |
Attributes |
|---|---|
Office |
*Office code |
Works in |
*Office code |
Department |
*Department ID |
Heads |
*Department ID |
Member of |
*Department ID |
Skill |
*Skill ID |
Expert in |
*Skill ID |
Employee |
*Employee ID |
To test for first normal form, look for attributes that can have repeating values.
Remove attributes when multiple values can apply to a single item. Move these repeating attributes to a new entity.
In the entity below, Phone number can repeat—an office can have more than one telephone number.

Remove the repeating attribute and make a new entity called Telephone. Set up a relationship between Office and Telephone.

Remove data that does not depend on the whole key.
Look only at entities and relationships whose identifier is composed of more than one attribute. To test for second normal form, remove any data that does not depend on the whole identifier. Each attribute should depend on all of the attributes that comprise the identifier.
In this example, the identifier of the Employee and Department entity is composed of two attributes. Some of the data does not depend on both identifier attributes; for example, the department name depends on only one of those attributes, Department ID, and Employee first name depends only on Employee ID.
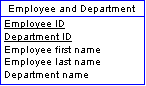
Move the identifier Department ID, which the other employee data does not depend on, to a entity of its own called Department. Also move any attributes that depend on it. Create a relationship between Employee and Department.

Remove data that doesn't depend directly on the key.
To test for third normal form, remove any attributes that depends on other attributes, rather than directly on the identifier.
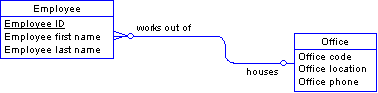
In this example, the Employee and Office entity contains some attributes that depend on its identifier, Employee ID. However, attributes such as Office location and Office phone depend on another attribute, Office code. They do not depend directly on the identifier, Employee ID.

Remove Office code and those attributes that depend on it. Make another entity called Office. Then, create a relationship that connects Employee with Office.
 Step 4: Resolve the relationships
When you finish the normalization process, your design is almost complete. All you need to do is to generate the physical data model that corresponds to your conceptual data model. This process is also known as resolving the relationships, because a large portion of the task involves converting the relationships in the conceptual model into the corresponding tables and foreign-key relationships.
Whereas the conceptual model is largely independent of implementation details, the physical data model is tightly bound to the table structure and options available in a particular database application. In this case, that application is Adaptive Server Anywhere.
In order to implement relationships that do not carry data, you define foreign keys. A foreign key is a column or set of columns that contains primary key values from another table. The foreign key allows you to access data from more than one table at one time.
A database design tool such as the DataArchitect component of Powersoft PowerDesigner can generate the physical data model for you. However, if you're doing it yourself there are some basic rules that help you decide where to put the keys.
One to many An one-to-many relationship always becomes an entity and a foreign key relationship.

Notice that entities become tables. Identifiers in entities become (at least part of) the primary key in a table. Attributes become columns. In a one-to-many relationship, the identifier in the one entity will appear as a new foreign key column in the many table.
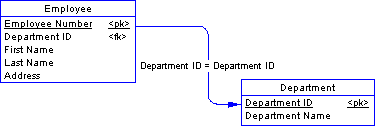
In this example, the Employee entity becomes an Employee table. Similarly, the Department entity becomes a Department table. A foreign key called Department ID appears in the Employee table.
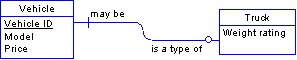
One to one In a one-to-one relationship, the foreign key can go into either table. If the relationship is mandatory on one side, but optional on the other, it should go on the optional side. In this example, put the foreign key (Vehicle ID) in the Truck table because a vehicle does not have to be a truck.
The above entity-relationship model thus resolves the database base structure, below.

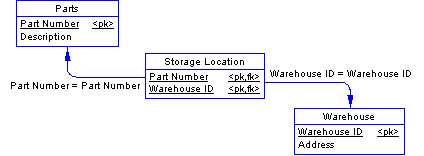
Many to many In a many-to-many relationship, a new table is created with two foreign keys. This arrangement is necessary to make the database efficient.
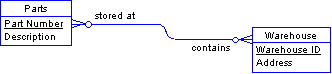
The new Storage Location table relates the Parts and Warehouse tables.
Some of your relationships may carry data. This situation often occurs in many-to-many relationships.
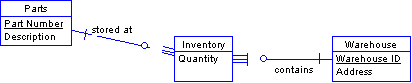
If this is the case, each entity resolves to a table. Each role becomes a foreign key that points to another table.
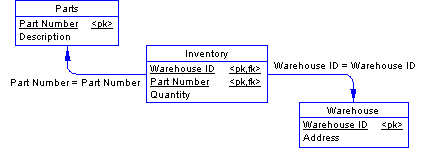
The Inventory entity borrows its identifiers from the Parts and Warehouse tables, because it depends on both of them. Once resolved, these borrowed identifiers form the primary key of the Inventory table.
Tip |
Step 5: Verify the designBefore you implement your design, you need to make sure that it supports your needs. Examine the activities you identified at the start of the design process and make sure you can access all of the data that the activities require.
Can you find a path to get the information you need?
Does the design meet your needs?
Is all of the required data available?
If you can answer yes to all the questions above, you are ready to implement your design.
Applying steps 1 through 3 to the database for the little company produces the following entity-relationship diagram. This database is now in third normal form.
The corresponding physical data model appears below.